How to Properly Care for and Maintain Your Studio Monitors
The step-by-step guide “How to Properly Care for and Maintain Your Studio Monitors” is a comprehensive resource that will assist you in properly taking care of your studio monitors. It addresses the common problem of users experiencing issues with their studio monitors due to neglect or inadequate maintenance.
The post provides a detailed explanation of the purpose and importance of studio monitors, emphasizing their role in accurately reproducing audio in a professional studio environment. It highlights the significance of maintaining these monitors in optimal condition to ensure accurate sound reproduction and prevent any potential damage or degradation.
By following the step-by-step instructions provided in the guide, you will learn how to clean and dust your studio monitors, properly position them for optimal performance, and protect them from potential hazards. Implementing these maintenance practices will not only extend the lifespan of your studio monitors but also enhance the overall audio quality and ensure a more productive and enjoyable studio experience.
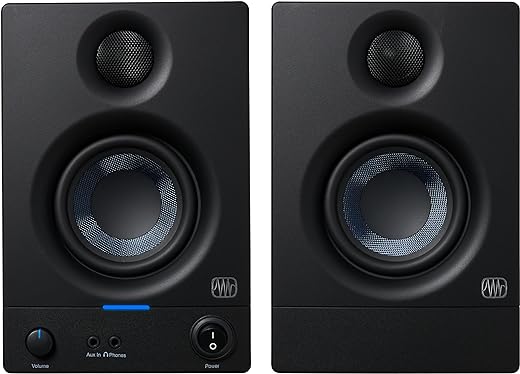
Top-rated studio monitors for professional sound


Step 1: Positioning your studio monitors
To ensure optimal sound reproduction, it is crucial to position your studio monitors correctly. Begin by placing the monitors at an appropriate distance from each other. The ideal distance is usually equal to the distance between your ears when you are seated at your listening position. This helps create a balanced stereo image and prevents any unwanted phase cancellation or comb filtering effects.
Next, position your studio monitors at ear level. This means that the tweeters, which produce the high frequencies, should be at the same height as your ears when you are seated. This allows for a more accurate representation of the audio and ensures that you are hearing the sound as it was intended.
To achieve this, consider using monitor stands or adjustable mounting brackets to elevate your studio monitors to the correct height. Avoid placing them directly on your desk, as this can cause reflections and affect the sound quality.
By following these positioning guidelines, you can greatly enhance the accuracy and quality of your studio monitor playback. Take the time to set them up correctly, as this will ultimately result in a better listening experience and more accurate mixing decisions.


Step 2: Cleaning the monitor cabinets
To regularly clean the monitor cabinets, start by gathering a soft, lint-free cloth. This cloth will be your go-to tool for removing dust and dirt from the surface. Using a gentle, circular motion, wipe the cloth over the entire cabinet, paying close attention to areas that tend to accumulate more debris, such as corners or edges.
It’s important to note that you should avoid using harsh chemicals or abrasive materials during this cleaning process. These substances can potentially damage the finish of the monitor cabinets, compromising their appearance and functionality. Stick to the soft cloth, as it is sufficient for removing dust and dirt without causing any harm.
By following these simple instructions, you can keep your monitor cabinets clean and well-maintained, ensuring optimal performance and longevity. So, make it a regular habit to give your cabinets a quick wipe-down with a soft, lint-free cloth, and you’ll enjoy a clean and dust-free workspace.
Step 3: Dusting the speaker cones
To gently dust the speaker cones, start by obtaining a soft brush or a can of compressed air. Make sure the brush has soft bristles to avoid scratching or damaging the cones. If you opt for compressed air, ensure it is specifically designed for electronics and comes with a thin nozzle attachment.
Hold the brush or can of compressed air a few inches away from the speaker cones to maintain a safe distance. Using gentle, sweeping motions, carefully remove any dust or debris that may have accumulated on the cones. Avoid pressing too hard or making direct contact with the cones, as this can cause harm.
Remember, it is crucial not to touch the speaker cones with your fingers. The oils and dirt on your skin can potentially harm the cones or affect the sound quality. By following these instructions and handling the speaker cones with care, you can effectively clean them without causing any damage.
Step 4: Checking and replacing cables
Regularly inspect the cables connecting your studio monitors to audio interfaces or amplifiers. Proper cable maintenance is crucial for ensuring optimal signal transmission and preventing unwanted audio issues. Follow these steps to check and replace any damaged or faulty cables:
- Visual Inspection: Carefully examine each cable for any visible signs of damage, such as frayed wires, bent connectors, or loose connections. Pay close attention to the areas near the connectors, as these are often more susceptible to wear and tear.
- Test for Signal Interruption: Connect your studio monitors to the audio interface or amplifier and play audio through them. While the audio is playing, gently wiggle and flex each cable to check for any intermittent signal loss or crackling noises. If you notice any issues, mark the cable for replacement.
- Replace Damaged Cables: Once you have identified any damaged or faulty cables, it is essential to replace them promptly. Ensure that you purchase cables that are suitable for your setup and provide optimal signal quality. Disconnect the old cable from both ends and carefully connect the new cable in its place, making sure it is securely fastened.
- Test the New Cables: After replacing the cables, test the audio signal again to ensure that the new cables are functioning correctly. Listen for any improvements in sound quality and check for the absence of any previously experienced issues.
By regularly inspecting and replacing damaged or faulty cables, you can maintain a reliable and high-quality audio signal flow in your studio setup. Remember to exercise caution when handling cables and always choose cables of good quality to ensure optimal performance.
Step 5: Calibrating the monitors
Adjust the settings on your studio monitors by using a reference track or a calibration tool. This step is crucial for achieving accurate sound reproduction and ensuring a balanced and transparent audio monitoring environment. Start by playing a reference track that you are familiar with and that represents the type of music or audio you will be working on. Listen carefully to the track and make note of any inconsistencies or imbalances in the sound.
Next, use the calibration tool or the built-in controls on your studio monitors to make adjustments. Begin by adjusting the volume level to a comfortable listening level. Then, focus on the frequency response of the monitors. Use the EQ controls, if available, to adjust the bass, midrange, and treble frequencies to achieve a balanced sound. Take into consideration the characteristics of the reference track and aim to match its tonal balance.
Additionally, pay attention to factors such as stereo imaging and overall clarity. Ensure that the sound is evenly distributed between the left and right channels and that there are no phase issues or excessive resonance. Make fine-tuning adjustments as needed until you are satisfied with the accuracy and transparency of the sound.
Remember to periodically recalibrate your studio monitors to account for any changes in the listening environment or equipment. By following these steps, you can optimize your studio monitors for accurate sound reproduction and enhance the quality of your audio work.
Step 6: Protecting the monitors
To properly protect your studio monitors, it is highly recommended to invest in protective covers or cases. These covers will shield your monitors from dust, moisture, and potential damage, whether during transportation or storage. Here’s what you need to do:
- Measure the dimensions of your studio monitors accurately. This will ensure that you purchase the right size of protective covers or cases.
- Research and select high-quality protective covers or cases that are specifically designed for studio monitors. Look for features like water-resistant material and padding for added protection.
- Purchase the chosen protective covers or cases from a reputable supplier or retailer. You can either buy them online or visit a local store that specializes in audio equipment.
- Carefully install the protective covers or cases on your studio monitors according to the manufacturer’s instructions. Ensure a snug fit to provide maximum protection.
- When not in use, keep your studio monitors covered with the protective covers or cases. This will safeguard them from dust and moisture, which can affect their performance and lifespan.
- During transportation, always use the protective covers or cases to shield your studio monitors from potential damage. Secure them properly to prevent any movement or impact while on the move.
- Regularly inspect the protective covers or cases for any signs of wear and tear. If you notice any damage, replace them promptly to maintain the optimal protection for your studio monitors.
By following these steps and investing in protective covers or cases, you can ensure that your studio monitors are well-protected from dust, moisture, and potential damage during transportation or storage.
Key Takeaways
In conclusion, by implementing these guidelines, you can effectively care for and maintain your studio monitors, resulting in exceptional sound quality and extended lifespan. With regular cleaning, proper positioning, and diligent monitoring of the volume levels, you can optimize the performance of your monitors and preserve their functionality for years to come. Remember, investing time and effort into the upkeep of your studio monitors is essential for achieving the best audio experience in your professional environment.


I would love to see a follow-up article on troubleshooting common issues with studio monitors.
This article was a great reminder to regularly check for loose screws or any other signs of wear and tear.
I never knew that dusting the monitors regularly could prevent damage. Thanks for the tip!
Do you have any recommendations for cleaning the speaker cones?
I always struggle with cable management. Any suggestions on how to keep the cables organized?
I found the section on proper positioning of the monitors very helpful. It really made a difference in the sound quality.
Great article! I learned a lot about properly caring for studio monitors.
I appreciated the reminder to avoid placing drinks near the monitors. I’ve had a spill before and it was a nightmare!