How to set up a MIDI controller in your DAW?
In this step-by-step guide, you will learn how to set up a MIDI controller in your digital audio workstation (DAW). Whether you are a music producer, composer, or aspiring musician, understanding how to connect and configure your MIDI controller is essential for unleashing your creativity. From choosing the right MIDI controller to mapping it to your desired software parameters, this guide will walk you through the entire process. So grab your MIDI controller, and let’s dive into the world of limitless musical possibilities.
Crazy Fact: Did you know that the first MIDI controller, the Sequential Circuits Prophet-600, was released in 1982 and featured a whopping 49 keys? It revolutionized the way musicians interacted with their instruments and paved the way for the MIDI standard we use today.
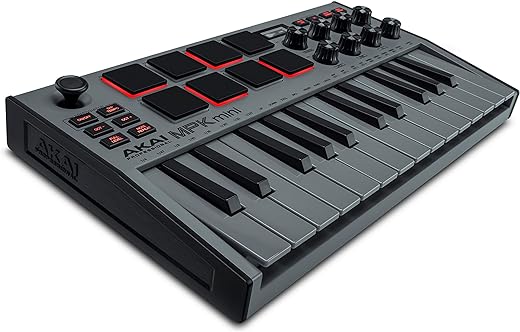
Top MIDI Controllers for USB Connectivity


Connect the MIDI controller to your computer
To use a USB cable to connect the MIDI controller to your computer, start by locating an available USB port on your computer. These ports are typically rectangular in shape and can be found on the back or sides of your computer. Once you have identified a suitable port, follow these steps:
- Insert one end of the USB cable into the USB port on your computer.
- For example, if you are using a desktop computer, you may find the USB ports on the back of the tower. Simply insert the USB cable into any available port.
- Connect the other end of the USB cable to the MIDI controller.
- Depending on your MIDI controller model, you may find a USB port on the device itself. Insert the USB cable into the corresponding port on the MIDI controller until it is securely connected.
- Ensure that the connection is secure and firmly in place on both ends.
- Gently tug on the cable to check if it is properly connected. If it comes loose easily, remove and reinsert the cable until it is secure.
By following these steps, you will have successfully connected your MIDI controller to your computer using a USB cable. This connection allows for the transmission of MIDI data between the controller and your computer, enabling you to control various music software or hardware instruments.

![Novation Launchkey 49 [MK3] MIDI Keyboard Controller - Seamless Ableton Live Integration. Chord Mode, Scale Mode, and Arpeggiator — for Music Production](https://m.media-amazon.com/images/I/71vCWeTszNL._AC_SL520_.jpg)
Install the MIDI controller drivers
If your MIDI controller requires specific drivers, you will need to download and install them from the manufacturer’s website. Start by identifying the make and model of your MIDI controller. This information is usually found on the back or bottom of the device. Once you have this information, navigate to the manufacturer’s website using your preferred web browser.
For example, let’s say you have a MIDI controller from a popular brand like “XYZ Music.” Open your web browser and enter “XYZ Music MIDI controller drivers” into the search bar. Look for the official website of XYZ Music and navigate to the support or downloads section. Locate the drivers specific to your MIDI controller model and operating system version. Download the appropriate driver file to your computer.
Next, locate the downloaded driver file on your computer, usually in the “Downloads” folder. Double-click on the file to begin the installation process. Follow the on-screen instructions provided by the driver installer. This typically involves accepting the license agreement, selecting the installation location, and choosing any additional settings. Once the installation is complete, restart your computer to ensure the new driver is properly loaded. Your MIDI controller should now be recognized by your computer and ready to use with the installed drivers.
Launch your DAW software
To open your Digital Audio Workstation (DAW) software on your computer, locate the application icon on your desktop or in your computer’s applications folder. Double-click on the icon to launch the software. Alternatively, you can also launch the software by clicking on the Start menu, searching for the name of the software, and selecting it from the search results.
For example, if you are using a popular DAW software like Ableton Live, you can find the application icon on your desktop or in the applications folder. Double-click on the icon to open the software. If you prefer to use the Start menu, click on the Start button, type “Ableton Live” in the search bar, and select the software from the search results. The DAW software will then start loading and open up a new project window for you to work with.
Once the software is open, you can explore its features and settings to create, edit, and mix your audio tracks. Familiarize yourself with the interface and toolbars, as well as the options available in the menus. You can start by creating a new project or opening an existing one. Remember to save your work regularly to avoid losing any progress. With your DAW software open, you are ready to begin your audio production journey.
Configure the MIDI controller in your DAW
To access the MIDI settings in your DAW and select the MIDI controller as the input device, follow these steps:
- Open your DAW software and navigate to the preferences or settings menu. This is usually located in the top menu bar or under the “File” or “Edit” menu.
- Look for a section or tab labeled “MIDI” or “MIDI settings” and click on it. This is where you can configure your MIDI devices.
- In the MIDI settings window, you should see a list of available MIDI devices. Locate your MIDI controller in the list and make sure it is connected and powered on.
- Select your MIDI controller from the list and set it as the input device. This will ensure that your DAW recognizes the MIDI signals from your controller.
- Save the changes and exit the MIDI settings menu. You are now ready to use your MIDI controller to control virtual instruments and record MIDI data in your DAW.
By following these steps, you will be able to access the MIDI settings in your DAW and configure your MIDI controller as the input device. Remember to connect and power on your MIDI controller before selecting it in the MIDI settings menu.
Assign MIDI controller functions
Map the various controls on your MIDI controller to functions within your DAW to enhance your workflow and streamline your music production process. Start by connecting your MIDI controller to your computer and opening your DAW software. Once your MIDI controller is recognized by your DAW, navigate to the MIDI mapping section or preferences menu.
Identify the specific controls on your MIDI controller that you want to assign functions to. This could include knobs, sliders, buttons, or pads. In your DAW’s MIDI mapping section, select the control you wish to map and click on the function within your DAW that you want to assign to that control. For example, you can map a knob on your MIDI controller to control the volume of a specific track in your DAW. Similarly, you can assign a button to switch between different instruments or map sliders to control parameters of effects plugins.
Repeat this process for each control on your MIDI controller that you want to assign functions to. Make sure to test each mapping to ensure it is working correctly. You can also customize the MIDI mapping by adjusting the range or scaling of the controls to suit your preferences. Once you have mapped all the desired controls, save your settings or export your MIDI mapping configuration for future use. This will allow you to effortlessly control various functions within your DAW using your MIDI controller, improving your workflow and enabling you to focus on your creativity.
Key Takeaways
In conclusion, setting up a MIDI controller in your DAW is a crucial step in enhancing your music production workflow. Throughout this guide, we have explored the key aspects to consider, such as connecting the controller, configuring the MIDI settings, and mapping the controls to optimize your creative process.
By following these steps, you will ensure that your MIDI controller functions seamlessly with your Digital Audio Workstation, allowing you to fully harness its potential. From improving the efficiency of your music production to expanding your creative possibilities, a properly set up MIDI controller can greatly enhance your overall experience.
Remember, taking the time to correctly set up your MIDI controller is an investment in your music production journey. It not only saves you time and frustration but also opens up a world of possibilities for creating and manipulating sounds.
So, whether you’re a beginner or an experienced producer, don’t underestimate the importance of correctly setting up your MIDI controller. Embrace the power it brings to your music-making process and watch your creativity soar to new heights.
Necessary Equipment

Proven Techniques
Guide to Using MIDI Controllers with USB Connection
- Connect the USB cable: Start by connecting the USB cable of the MIDI controller to your computer. This will establish a connection between the two devices
- Install drivers (if necessary): Some MIDI controllers may require specific drivers to be installed on your computer. Check the manufacturer’s website or the included documentation to see if any drivers are needed, and install them accordingly
- Configure MIDI settings: Once the MIDI controller is connected, you may need to configure the MIDI settings on your computer. This involves selecting the MIDI controller as the input/output device in your music production software or digital audio workstation (DAW)
- Learn basic functions: Familiarize yourself with the basic functions of the MIDI controller. This can include buttons, knobs, sliders, and pads. Read the user manual or search online tutorials to understand how each control works and how it can be used to manipulate your music software
- Experiment and practice: Finally, start experimenting with your MIDI controller. Practice using it in combination with your music software to create different sounds, control virtual instruments, record MIDI data, or perform live. The more you practice, the more comfortable and proficient you will become with using your MIDI controller


I have a MIDI controller that doesn’t require drivers. Do I still need to install anything?
If your MIDI controller is class-compliant, meaning it can plug and play without requiring additional drivers, then you don’t need to install anything. Just connect it to your computer and it should work with your DAW software.
Can you recommend a good MIDI controller for beginners?
I followed all the steps, but my DAW is not recognizing my MIDI controller. Any troubleshooting tips?
Sorry to hear that you’re experiencing issues. First, double-check that you’ve installed the correct drivers for your MIDI controller. If the problem persists, try connecting the controller to a different USB port or restarting your computer. If none of these solutions work, it might be worth reaching out to the manufacturer’s support for further assistance.
I found that assigning functions to my MIDI controller buttons is a bit confusing. Any tips on how to do it effectively?
Assigning functions to your MIDI controller buttons can be a bit overwhelming at first, but here’s a tip: start by mapping the most commonly used functions to the buttons that are easily accessible while you’re performing. This way, you can quickly control those functions without interrupting your workflow.
Could you write an article about optimizing MIDI controller settings for latency reduction?
That’s a great suggestion! I’ll make a note of it and consider covering it in a future article. Thank you for your input!
I use my MIDI controller for live performances. Can you suggest any creative ways to use it?
Absolutely! One creative way to use your MIDI controller during live performances is to map different effects to the knobs and sliders. This allows you to manipulate and control the effects in real-time, adding a dynamic element to your performance.
Sure! For beginners, I would recommend the Novation Launchkey Mini MK3. It’s affordable, compact, and has all the essential features you need to get started with MIDI controllers.
Thanks for the guide! I was able to set up my MIDI controller without any issues.
You’re welcome! I’m glad to hear that the guide was helpful to you. If you have any more questions or need further assistance, feel free to ask. Happy music-making!